My garage doesn’t have electricity and I don’t have room for a big pump setup in my house, but I wanted to try hydroponics and see what I could do with it.
I thought there must be a way to do this that doesn’t require electricity or a pump. But every method out there requires some sort of pump for aeration. Except this one method that I was able to find.
Why Hydroponics?
Hydroponics is the growing of plants immersed in an water-nutrient solution, usually with some soil-less growing medium like gravel, sand, coir or polymer clay balls.
Growing food hydroponically has some advantages and also controversies. The biggest advantage of hydroponics is that it delivers nutrient rich water directly to the plant, so efficiently that plant growth is greatly accelerated.
Hydroponics is also more compact that growing outdoors in soil, which is one reason the home-hobby is still dominated by the cannibus growing crowd.
Hydroponics is also being utilized by agriculture industy. I recently visited a u-pick strawberry farm with my family that grew their strawberries outdoors, in 4 layers of hydroponics tubes, using coir as their growing medium. This New York Times article describes a massive hydroponics operation being used to grow produce in Kentucky. Because of the human controls hydroponics allows for, all seasons of vegetables are able to be grown all year.
That same article also points out a controversy with hydroponics, which is nutrition. I ran into a nutrition question when I was preparing my experiment here.
Hydroponics relies on chemical nutrition that is mixed into the water in order to feed the plants. This is an input, so hydroponics done this way can’t fit into permaculture unless we find a way to do this ourselves.
Also, many people in permaculture are purists about building soil, a years-long process of adding nutrients to soil through compost, mulch and crop rotation while protecting against erosion. Real soil is going to have a broader range of micronutrients than these chemical concoctions. And these nutrients end up in the final plant. Therefore it is reasonable to expect that soil raised foods will be more nutrient-rich than hydroponic raised foods.
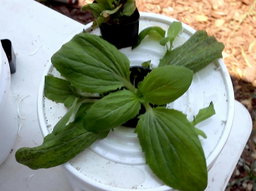
The Setup
This is a very simple, one bucket setup. The idea is, as the plant grows and consumes water, the water level in bucket lowers. As the water level in the bucket lowers, parts of the roots are exposed to oxygen. But there is never so much exposure to oxygen that the roots completely dry out and die.
This illustration shows what happens to the plant over a short time period as the nutrients are consumed.

Supplies: What You Need
- 2-5 gallon Food Grade Bucket: 5 gallons are easier to come by but can be quite large. I found a two gallon good grade bucket at Lowe’s. If you won’t be growing food, you might consider a less expensive, non-foodgrade bucket. A storage bin can work and allow for multiple baskets if you will not be growing food.
- Lid for Bucket These are usually sold separately, which can be an advantage in case you make a mistake, you only have to buy a new lid.
- Hydroponics Food I’m going to experiment with regular liquid fertilizer, but in my setup I played it safe and went with a food that was made for hydroponics, figuring it may contain more nutrients to meet the full needs of the plant. Other than Aeroponics, I found my options were limited to unfamiliar companies marketing toward marijuana growers.
- Hydroponic Basket These are specialized plant baskets meant for hydroponics. They are basically 3" round, plastic pots that have a lot of holes so the water solution can pass through. They are easy to find on Amazon or from any hydroponics supplier.
- Water
- Potting Mix You need some kind of soilless medium. Turns out the Basic Potting Mix I use for seed starting is perfect for this.
- A Plant In the video at the bottom of this post, I experimented with seed starting and a basil cutting, but it is best to start with a seedling that has roots. I would also choose a plant that does well in water. Lettuces and herbs are good for this. My first experiement was with a "Seep Monkeyflower" which is a native plant that grows in soggy soil along streams and it did amazing.
- Permanent Marker You need something to mark the lid before you cut. Sharpie-type permanent markers seem to be the obvious choice, but anything that can mark the lid will work.
- Craft Knife You’ll need an x-acto knife to cut out the circle. I tried scissors the first time, but that just made a mess and I had to finish with an x-acto knife anyway. A box cutter might work better for the initial hole since the blade is firmer, but I haven’t tried that.
Assembly
Step 1: Trace a Circle on the Bucket Lid
The circle needs to fit the hydroponic basket. Take a sharpie and the bucket lid and trace a circle around the small part of the hydroponic basket.
Step 2: Cut out the Circle
Using an x-acto knife, cut the circle that you just wrote on the lid. Once you have done that, test the basket to see if it will easily fit in the lid. Use your x-acto knife to shave out the sides of the hole to make it larger until the basket easily fits.
The circle should be as close to a circle as possible, but it doesn’t have to be perfect.
Step 3: Pot the plant
Add your soil-less medium to your hydroponic basket and add your seedling. This is just like potting any other plant.
Step 4: Fill the Bucket
Fill the bucket with 1/4 tsp of plant nutrition per gallon (1/2 tsp for a 2 gallon bucket, 1 1/4 tsp for a 5 gallon buckt), assuming you are using Aeroponics plant food. Follow the directions on your plant food if you are using something else.
Leave at least an inch of space from the top of the bucket to the top of the water. When you put the basket it, some water will be offset, also there is no reason to fill it all the way to the top.
Step 5: Put the Lid on the Bucket and Add the Basket
The level of the water should cover at least half of your hydroponic basket.
And that’s it! You should keep the plant somewhere it can get plenty of sunlight. I keep mine on my porch where it gets some sun protection for much of the day, but still plenty of light overall.